Home alarm clock: no progress

Today was pretty depressing. I want my morning alarm clock to be some sort of automation that plays three MP3 files I own on the sound equipment in my bedroom. I spent a lot of time today and do not have a solution.

When I bought the soundbar from Costco, I didn’t know to shop for something Home Assistant compatible. Although, even if I did know that, I think I’d still be stuck because I would feel like an absolute fool to pay $1,000 for a Sonos Soundbar. Sonos is the only vendor of soundbars that plays really nice with Home Assistant.

Apparently, way back when, some LG Soundbars had Ethernet ports on them, and they played nice with Home Assistant. Those aren’t available anymore; with everything having switched over to Bluetooth.

My current solution is an iPad using Bluetooth to light up the soundbar I hooked up to my TV. It works, often. But it doesn’t work 100%, which is a problem for the functionality of an alarm clock.

Also, there is no volume control: whatever the TV left the volume at, the music will play at that volume the next morning. This is sometimes a problem if the movie the night before was really loud, and I needed to turn down the volume to not blast out the neighbors or the speakers. I want automation to make my life less manual control, instead of “Oh! I changed the volume on the TV! I need to reset to xx for tomorrow morning!” just before I fall asleep. That’s the opposite of starting a nice night’s sleep.

My brother gave me a Mini PC running Windows 11 for Christmas. I was hoping that today I could set it up to use the soundbar as a Bluetooth speaker. Well, yes, when connected to a monitor and keyboard and mouse, I did get an MP3 file to play via Bluetooth on the soundbar.

So close.

But what about when the Mini PC is running headless? Nope. Could not get that to work. It is Microsoft Windows, after all. I’ve been using Microsoft products for 30 years, and they just are not good at automating anything. I suspect they think that automation is a Bad Thing, and should only be wielded by wizards instead of mere mortals.

So here I am at the end of a wasted day, without a better solution for my home automation alarm clock that mostly works. It is depressing.
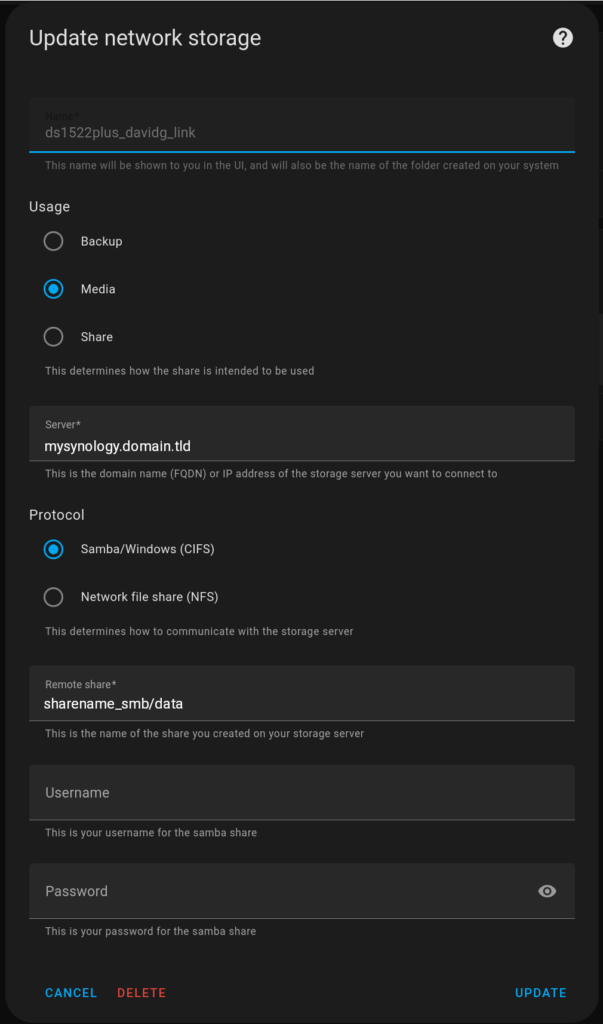
Home Assistant media folder – connect to SMB share

Ooof. This one kicked my ass for a really long time. The question is “How to connect the Home Assistant Media folder to an SMB share?” There’s a wizard, but what to enter for the Remote share entry is murky.

A part of this is pretty obvious, but the other part is not. Of course, I tried the wizard first, but I didn’t enter the Remote share entry correctly. I tried reading the documentation, but it wasn’t much more than “For the Remote share entry, put in the remote share.” Home Assistant would always fail to mount the share, and the error message was (essentially) “It didn’t work”. Sigh.

I had previously created an SMB share on my Synology NAS, and could map to it just fine from my main Linux desktop, from my Nextcloud instance, and from Windows machines I have here on my home network. I knew from my Nextcloud install (adding it to /etc/fstab) that the vers=3.0 option was important.

Doing a search found a Youtube video about editing the /config/configuration.yaml file and running a shell command. It mentioned that the vers=3.0 was important. Maybe this is what I need? This turned out to be a rabbit hole (but no rodent with a mean streak a mile wide at the end 1).

Since the system-launched shell command wasn’t working, I tried the next logical step: try it from an actual command line. It didn’t work. I think that is because of Docker and the impermanence of the terminal shell and sandbox for security.

I installed a terminal app in Home Assistant, but whenever I tried the same mount command that worked on Linux, it would fail on Home Assistant with “permission denied”. Not really helpful. In fact, it seems unhelpful, because if I read between the lines 2 I see “your password is wrong” – which it wasn’t. “Permission denied” is the error message you get when your password expires, and the credentials file has the old password. Of course, I knew my password was correct: but if I were someone brand new to this, I would have been mislead by my own thinking.

Here is the mount command that does work in Linux but not in Home Assistant:

mount -t cifs -o vers=3.0,credentials=/config/.smbcredentials //mysynology.domain.tld/sharename_smb/data /media/nasfiles 3 4

The problem that I was running into was that the Home Assistant documentation never tells you what it wants for “Remote share”. The dialog box says “This is the name of the share on your storage server” – but that doesn’t help, because it doesn’t specify what to put in. That’s why I’m writing this post: if you have a mount command that does work elsewhere, the pieces you need are here.

Over on the Synology, it told me the share name was smb://mysynology.domain.tld/sharename_smb/data

That does not work here in Home Assistant.

Here are the settings that do work:

So, from the mount command above, the Server entry is mysynology.domain.tld and the Remote share entry is sharename_smb/data

Phew. This was a long time in figuring out, as I tried all sorts of stuff for the Remote share entry:

  • /sharename_smb/data 5
  • mysynology.domain.tld/sharename_smb/data
  • //mysynology.domain.tld/sharename_smb/data
  • mysynology/sharename_smb/data
  • smb://mysynology.domain.tld/sharename_smb/data
  • \\mysynology.domain.tld\sharename_smb\data
  • \\sharename_smb\data
  • \\\\sharename_smb\\data
  • sharename_smb
  • data ( with the Server being mysynology.domain.tld/sharename_smb )

Hopefully, if you found this post, it helps:

Server entry is mysynology.domain.tld

Remote share entry is sharename_smb/data

  1. Thank goodness it wasn’t the Rabbit of Caerbannog ↩︎
  2. which is a bad idea. ↩︎
  3. host name and share name changed to protect the innocent. Not that any of this is on the public Internet, but why tempt the random bored teenager? They can be pretty clever and persistent. ↩︎
  4. Yes, I had to create a directory named config off the root of my Linux box and copy the .smbcredentials file to it for the mount command to be an exact replica of what would have gone in the shell command in /config/configuration.yaml ↩︎
  5. so close. ↩︎

I kind of hate Docker

The beauty of Linux is that every program writes log files. The ugly of Docker is that nothing exists after the session ends. Because things like my ssh session are running in a temporary limited container, nothing works and there’s no record of what went wrong.

I’m trying to get a share on a Synology mounted as the media folder in Home Assistant, but Home Assistant doesn’t do SMB 3. There’s a video that shows how to edit a config file to make it work; but, for me it doesn’t work. That would be fine if I could see the log files to figure out what is making it unhappy with my particular installation. But there are no log files from Home Assistant. It is reporting all clear / everything is good. But of course the files aren’t there from the CIFS / SMB share I’m trying to mount.

I tried using ssh to manually do the mount command, but that didn’t work, and the Dockerized ssh doesn’t have access to the log files. This is bullshit.

Maybe I hate Home Assistant for being Docker -only software. Except that every time I have tried to get something to work with Docker, it didn’t, and there was no way to tell what went wrong. Even the stuff that did some logging, logged only the most trivial of events. Service started. Service ended. Gee, thanks for the detail. That was super helpful. Who wrote this? Windows programmers?